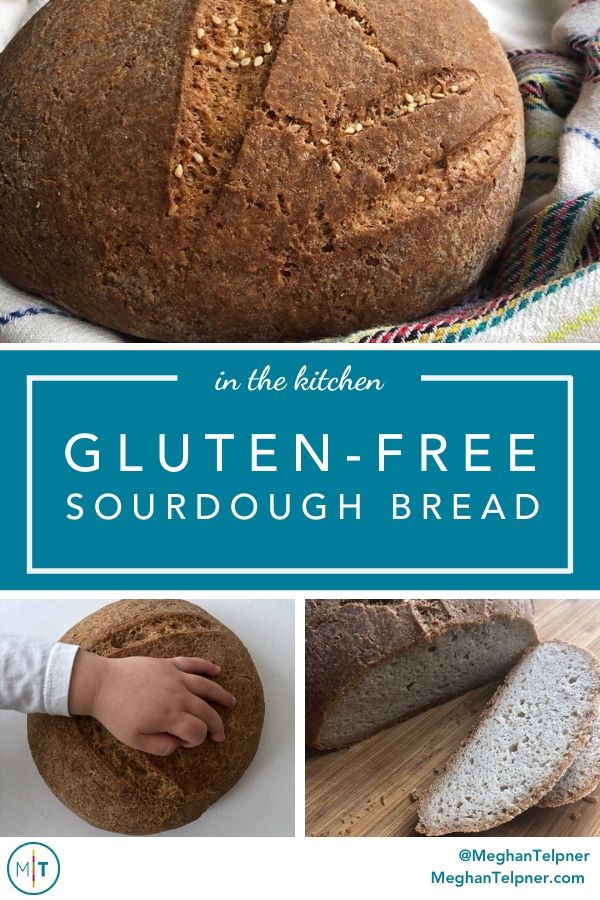
I first went gluten-free in 1995. The options at that time were limited, to say the least. I believe I swapped bread for rice cakes, or loaves of white rice flour bread that were like compact bricks of starch and filler. Which brings me to today, in which the abundance of product options are overwhelming. Furthermore, I am blown away by the amazing resources out there that enable us to make gluten-free foods at home that are substantially better than anything we could ever find in stores.
As you know, I have been creating and teaching gluten-free eating for well over a decade, and teaching you how to do the same with the Culinary Nutrition Expert Program. Yeasted and sourdough baking, however, was something I resisted. I attempted a sourdough way back in 2008. I kept my starter in the window to catch wild yeasts. Did I let my dough rise? I can’t remember. All I know was after a week, I baked something that could double as a brick. I never went back to try it again until my long-time friend, Heather Crosby, launched her Gluten-Free Baking Academy (now called the Good Food Cooking School). The photos she shared of her breads blew me away!
I knew it could be done, but seeing Heather’s work gave me hope that I could do it, too! Since then I have been cheerleading for the Good Food Cooking School.
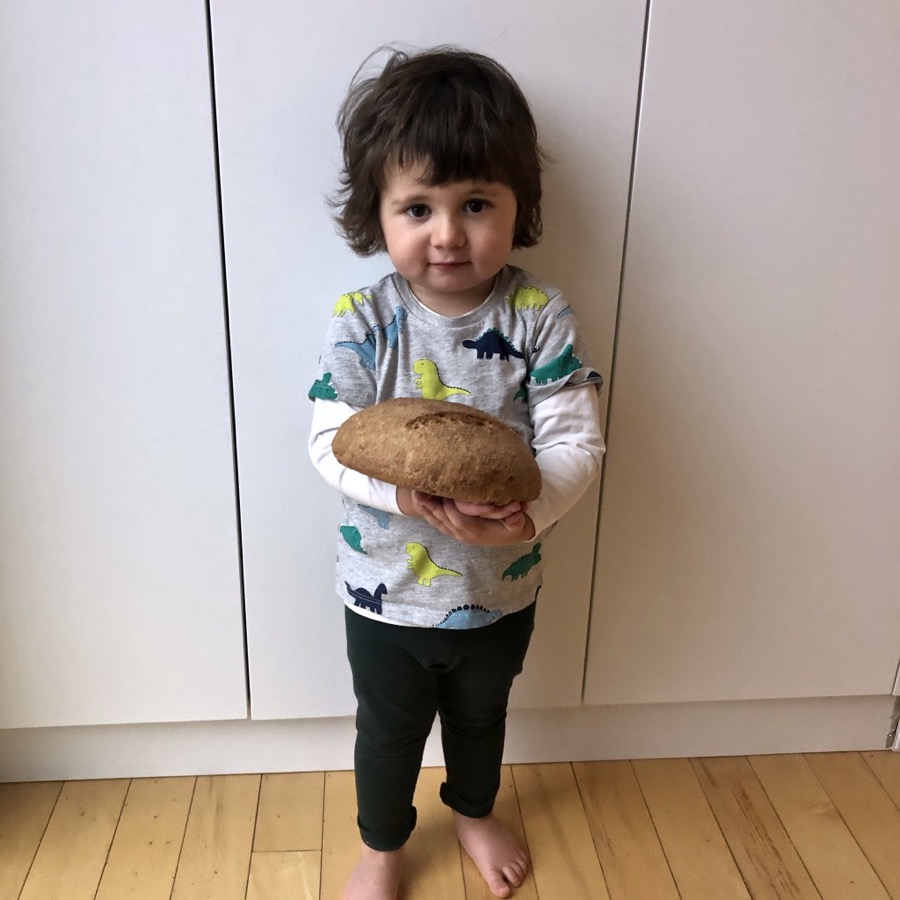
And so, the time was right for me to give sourdough baking another shot. My son has become my bread-baking partner. He is two and a half, and takes care of dumping the measured flour and sifting it. We take turns on the dough mixing.
The pride he has in taking a bite of our finished loaf is pure magic!
Let me preface by saying, I am no way near as expert at this as Heather is. I am not sure I’d be equipped to answer any troubleshooting questions and I definitely can’t offer recipe alternatives. Bread baking is an art and a science and I am merely a novice here.
Overcoming The Sourdough Barriers
The Time Challenge
One of the most prohibitive factors for me was the timing. I followed loads of different people’s guides and recommendations, but it wasn’t until I turned it on its side, broke a few rules, and made some new ones that I was able to make weekly bread baking fit into my schedule. I have given timeframes below but have also indicated when I did each step to make it easy to fit into any day of the week.
Ingredient Needs
There are so many different ways to make a gluten-free sourdough. The key is that you don’t have to try them all at once. Begin by getting only what you need for your first loaf. When you are ready to branch out, get other things then. Stocking a pantry like you’re opening a bakery will be very costly and likely wasteful.
Essential Equipment
Again, this could also easily become overwhelming when you start looking at baking supply shops online. People are passionate about bread baking. I have found that I can easily make do without most things, and have added a couple basics as I go. Below I have outlined the tools for a round, rustic loaf:
1 cereal bowl with an 8-inch diameter – You could use any bowl to help shape your bread or get one of these. You just want to ensure whatever you use is slightly smaller than your dutch oven.
Parchment paper
Dry measuring cups and spoons
Sieve for sifting flour
Could you do this without a pizza stone? Probably. Could it work without a dutch oven? Yes – the Good Food Cooking School offers some options. All I can do is share what I have personally tried and what works great for me!
Sign up below for your free printable Gluten-Free Sourdough Recipe Guide
Free Resource Library
Enjoy more than 40 downloadable guides, recipes, and resources.
Get Your Starter Going
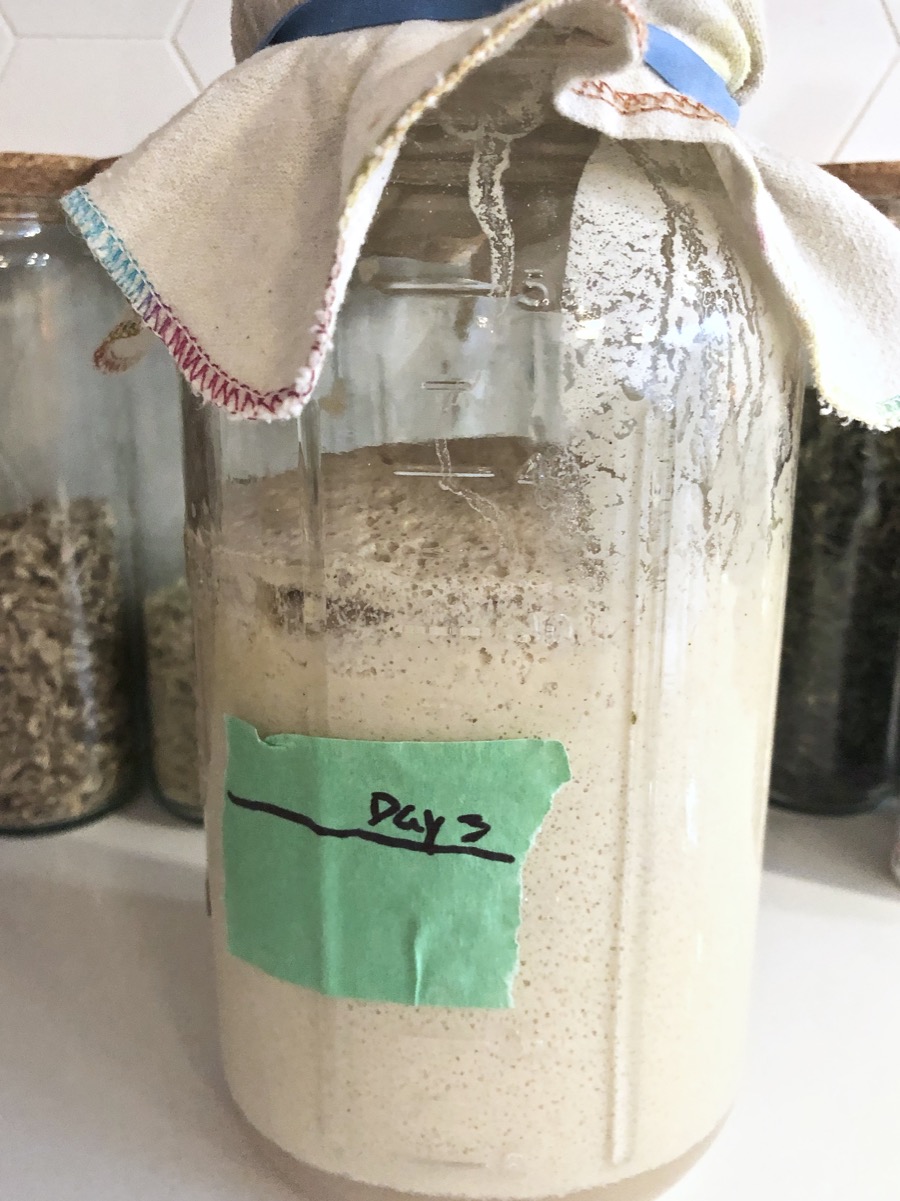
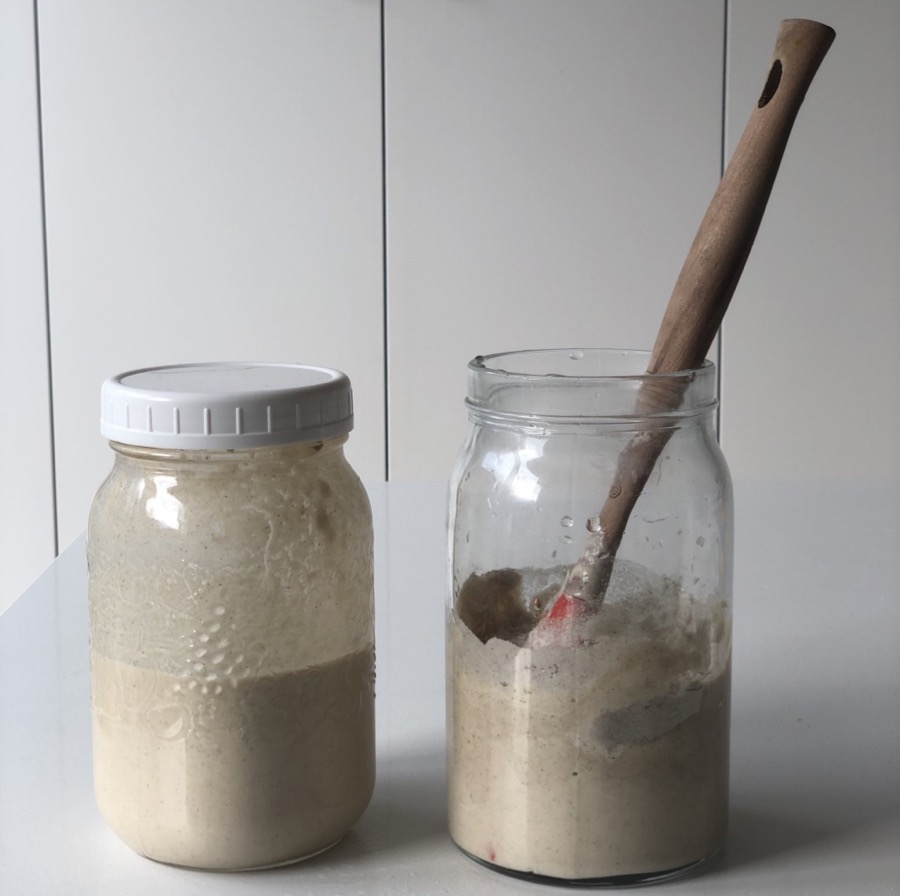
Getting your first starter ready is likely the most nerve-wracking and challenging part of the whole process. The starter is what will make your bread rise, and creating a starter with wild yeast takes about 8 days. It’s a process of adding flour and water to a jar, twice a day while catching some wild yeast in the air. That yeast helps activate the starter and ferment it. It’s this fermentation that gives sourdough it’s signature sour taste, and gets your bread rising.
(Where it says Morning + Night, it means you are doing this step twice)
Day 1 Morning + Night: Add 1/2 cup flour, 1/2 cup water and 1 Tbsp maple syrup, stir and cover with cloth.
Day 2 Morning + Night: Add 1/2 cup flour and 1/2 cup water, stir and cover with cloth.
Day 3 Morning + Night: Pour out any clear liquid that has settled at the top. Mix the remaining starter and discard 1/4 cup. Add 1/2 cup flour and 1/2 cup water, stir and cover with cloth.
Day 4 Morning + Night: Gently mix starter and discard a 1/2 cup. Add 1/2 cup flour and 1/2 cup water, stir and cover with cloth.
Day 5 Morning + Night: Pour out any clear liquid that has settled at the top. Gently mix starter and discard a 1/2 cup. Add 1/2 cup flour and 1/2 cup water, stir and cover with cloth.
Day 6 Morning + Night: Gently mix starter and discard a 1/2 cup. Add 1/2 cup flour and 1/2 cup water, stir and cover with cloth.
Day 7 Morning + Night: Gently mix starter and discard a 1/2 cup. Add 1/2 cup flour and 1/2 cup water, stir and cover with cloth.
Your starter should now be ready to go. It will have a distinctly yeasty/sour smell and will be a bit bubbly. There shouldn’t be any grey fur or other indications of mold. If there is, dump and start over. You can store this in the fridge if you’re not ready to bake. If you are ready, proceed to my next instructions below.
A Note About Dumping The Starter Each Day
This was the part that was nearly my downfall. I hated throwing out perfectly good flour, but you must just accept it and move on. This only has to happen while you are getting your starter ready. After that, no more dumping (which I explain below).
Why? (My only troubleshooting tip)
The reason is that the yeasts need fresh fuel – the sugars in the flour to digest. If you aren’t discarding, you’ll be diluting the concentration of your starter. There won’t be enough yeast to keep feasting. What I found was that on Day 3, my starter was going gang busters but by Day 4, it had fallen flat. I tried putting it on heat to see if that was the issue. In a last ditch effort, I split my starter in two, so I was now working with half the concentration, and put the other half in the fridge. I continued to feed/dump from the one jar and by Day 6, the bubbles were back.
Preparing Your Starter For Baking
When it comes time to bake your bread, you want your starter to be bubbling – what is often referred to as active! You want those yeasts working.
If you are baking on Day 7 of the starter-making process, you likely don’t need to do this, but if, like me, you’re not that organized this works great.
Take the starter out of the fridge and using a spatula, mix well. Transfer about 1 cup of starter into a second Mason jar and allow it to come to room temperature (or if you don’t have enough time to get to room temp, just let it sit as long as you have time for).
Feed with 1/2 cup sorghum flour and 1/2 cup of water, after about two or three hours, you should see some bubbling activity or, if you’re not home, just trust that it’s happening.
4-6 hours later, feed again with another 1/2 cup of flour and 1/2 cup of water.
Allow to sit for 3-4 hours before using in baking.
To get 1 cup of active starter as needed for your bread, just before measuring it out, give your starter a light stir, and pour out the 1 cup of starter just before adding to your dough.
The Recipe: Gather Your Ingredients
Once you have your starter ready, the rest is so wildly simple. Believe me. If it wasn’t, I wouldn’t still be doing this.
Mindfully measure your ingredients. Accuracy matters.
In a large glass mixing bowl, sift together your dry ingredients.
Once sifted, use a fork or spatula to further mix to ensure your flour is well-combined.
Mix in water and avocado oil. Begin mixing with your spatula and then with clean hands, get in there and ensure dough is well-mixed. You can pull the dough off the side of the bowl and then push down in a kneading action. Mainly you want to ensure the dough is well-mixed.
Set dough aside for 1-2 hours or can keep in the fridge for a day or so or overnight. If putting in the fridge, allow time for it to come to room temperature before the next step.
Once dough is set, stir in 1 cup of well-fed, active starter and 1 Tbsp of cider vinegar and using your hands, mix together until well-combined and you have a somewhat firm dough that already feels like it has a little bounce.
Transfer your dough to a towel-lined bowl or bread-proofing basket. Cover and place in a warm spot in your home and let dough rise for 4-6 hours or overnight. It should rise about 1 inch.
When ready to bake, place your pizza stone and empty Dutch oven into the oven and preheat to 450 degrees. Allow the pizza stone and empty Dutch oven to heat for 30-40 minutes.
With your dough now risen, cut a piece a parchment paper slightly larger than your dough so that you can hold it by the parchment when you lower it into the Dutch oven.
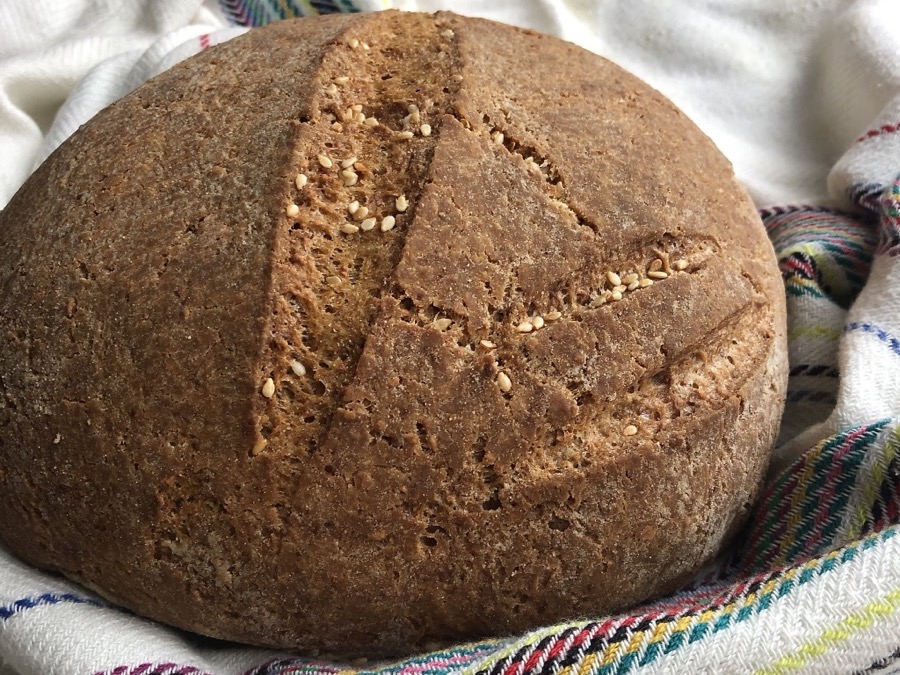
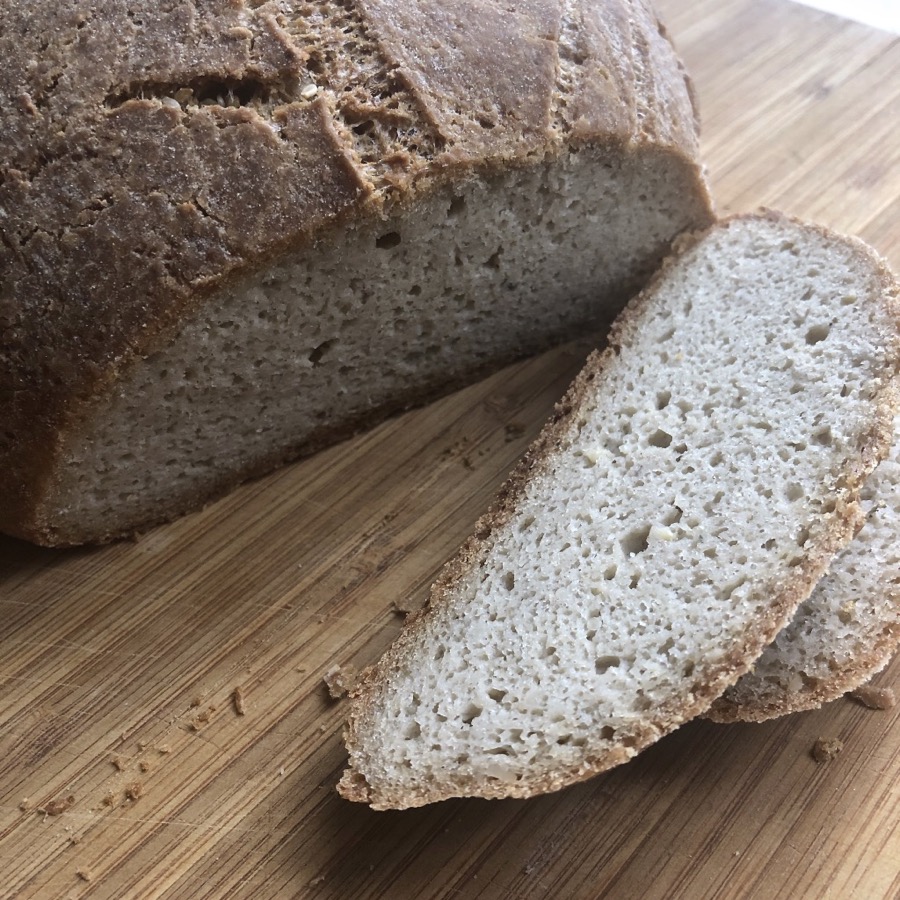
Carefully turn your dough over, flat side down and place on parchment. With a sharp knife, score the top of your bread about ¼-inch thick in a slight ‘S’ curve.
Remove Dutch oven from the oven and *extremely* carefully, lower your dough into it.
Cover and put in the oven and bake for 25 minutes.
At the 25-minute mark, remove lid and bake for another 25 minutes.
Remove bread from Dutch oven and place back in the oven directly on the pizza stone or if not using, right on the wire rack and bake for another 10 minutes.
Remove and place on cooling rack for 2-3 hours until bread has cooled substantially. Cutting it too soon can result in too much moisture loss or potentially, a collapse of your bread.
Will keep on your counter for 3 days, or slice and store in the fridge or freezer.
Prep Time:45 mins
Cook Time:1 hour
Sign up below for your free printable Gluten-Free Sourdough Recipe Guide
Free Resource Library
Enjoy more than 40 downloadable guides, recipes, and resources.
My Bread-Baking Schedule
This has been the timing that I have found works really well for me.
Anytime In The Week (let’s say Wednesday)
Sift together the dry ingredients and store/set aside until I am ready to make the dough/bake.
Dough-Making Day (Day Before Baking Day / let’s say Friday)
Morning:
Take starter out of the fridge and using a spatula, mix well. Transfer about 1 cup of starter into a second Mason jar and allow it to come to room temperature (or if you don’t have enough time to get to room temp, just let it sit as long as you have time for)
Feed with 1/2 cup sorghum flour and 1/2 cup of water, after about two or three hours, you should see some bubbling activity or if you’re not home, just trust that it’s happening.
Afternoon or when you get home from work (say around 6pm)
Feed with 1/2 cup sorghum flour and 1/2 cup of water, after about two or three hours, you should see some bubbling activity.
Mix wet ingredients (oil and water) into dough and set aside for an hour or two. (If you need to do this step in the morning, you can, so instead, at this time you’d take it out of the fridge and let it come to room temperature. I’ve also forgotten to take it out and mixed my starter into the dough when the dough was cold from the fridge and all was still totally fine).
Before bed (say around 9 or 9:30pm)
Mix you starter into your dough and knead until well-mixed. Place dough in towel-lined bowl and place in a warm spot to rise overnight (or if not overnight, for 4-6 hours until it’s puffed about an inch or so).
Baking Day (Let’s say Saturday morning)
When you wake up (7:00am, right?) with the pizza stone and dutch oven in the oven, preheat the oven to 450 and let stone and dutch oven pre-heat for 30-40 minutes and follow the remaining baking instructions outlined in the recipe above.
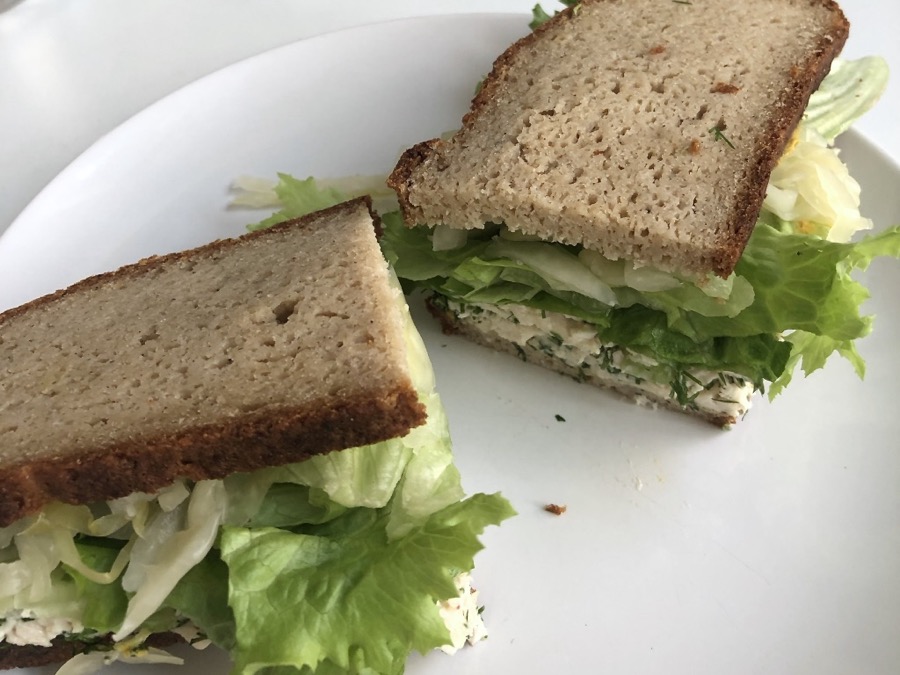
Most Important Step: Make A Sandwich
Honestly, though. A sandwich may be one of the most exciting things in all of this. Since going gluten-free, I’ve been hard pressed to find a bread that isn’t a giant starch fest that holds together and is soft enough to make a sandwich. This bread does and it was everything I remembered and more!
Sign up below for your free printable Gluten-Free Sourdough Recipe Guide
Free Resource Library
Enjoy more than 40 downloadable guides, recipes, and resources.
You Can Do It! (It’s Not As Complicated As It Reads)
I wrote the above 100% from memory. I have baked maybe five loaves so far and am just now starting to experiment with grain-free flours. But I know that reading through all the instructions above can seem overwhelming. It’s not until you start baking that you’ll experience how incredibly easy this is to do. Please do it!
Read through the above instructions a few times. Print it out if you need to and make your own notes. Follow it all step-by-step. Google if you have doubts or aren’t sure of something. But then just go for it. Practice will make deliciousness!
If you want to take a deep dive into gluten-free baking, then be sure to check out the Good Food Cooking School. Heather has you covered!
This post contains affiliate links to the Good Food Cooking School, formerly known as the Gluten-Free Baking Academy.
Free Resource Library
Enjoy more than 40 downloadable guides, recipes, and resources.
I’m so glad to see you writing about gluten free sourdough. I went gluten free in 1991 and I too ate a lot of rice cakes and bricks. Those memories stick. I learned how to make my own gluten free sourdough starter 3 years ago and, as you said, I can’t ever go back. I love it. I think everyone who is gluten free deserves to know about gluten free sourdough. I make everything with mine now – bread, pancakes and waffles, crackers, muffins, pizza crusts and more. Such a game changer. Heather’s course is a great place to start (I took that too)!
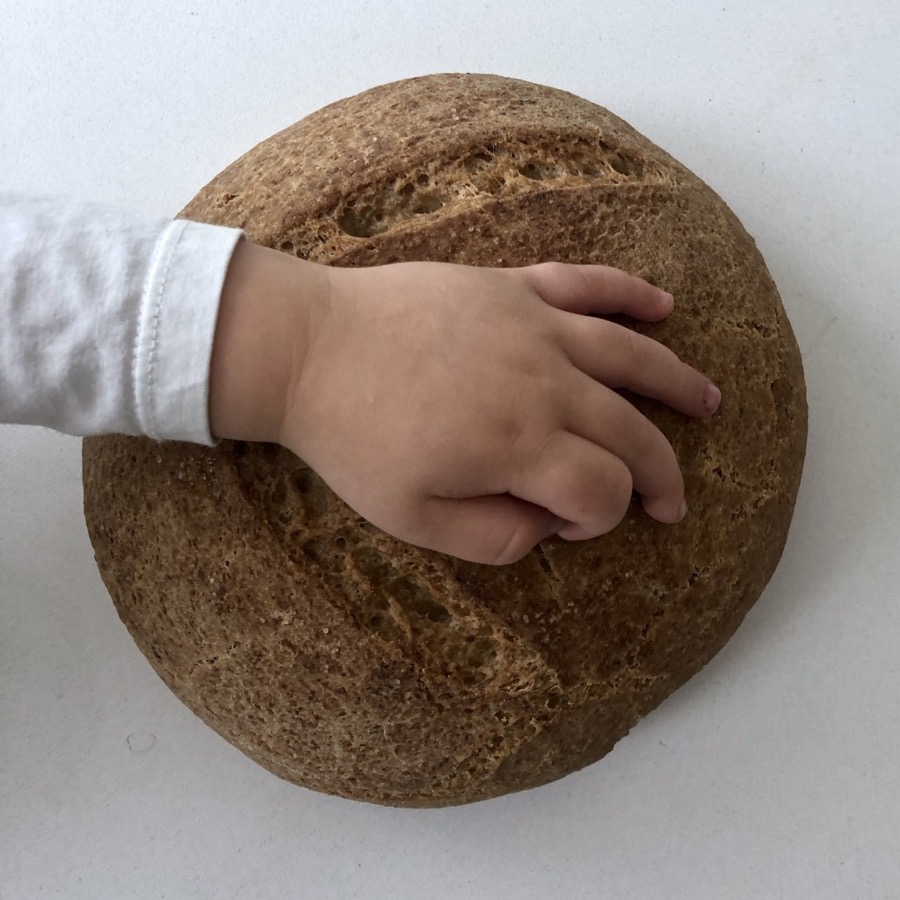
Hello Meghan, I am also an alumni of the GFBA & haven’t tried the sourdough as yet. That is my goal for this year. I am just wondering how big is your actual loaf. They always seem to be fairly large when you look at the picture but I figure they can’t be very big as they are proofed in an 8 inch bowl. I guess it spreads a bit when you put it on the parchment. I would think the loaf would look like an extra large roll. Your loaf looks great!
Hi! So excited to try this! Can you offer any recommendations on where you get your ingredients (like sorghum flour.. psyllium husk) do you order from somewhere or buy local?
Hi Meghan
Should I follow your instructions on how much flour to discard or the fresh to real one? I’m just asking because both recipes have different amounts to discard. The fresh to real one says 1 or 2 spoonfuls.sorry I have so may questions. I’m just new to this. Thanks for your help!
Val, thanks for that! I would much prefer not to have to purchase that much sorghum flour, so I’m glad you shared your info. :-) I think that was the “game changer” that nudged me more towards trying this. That, and the photo of the sandwich!!!
Val – on the discarding-some days, how much did you discard?
Meghan – Thank you! What great photos. I have a couple of questions.
1. I’d prefer not to use avocado oil because I can’t eat avocados. Any suggestions on which oil to use? Maybe olive oil?
2. In order to keep the cost down, I’m interested in Val’s method of using 1-2 Tbsp each of flour and water. I realize that you have probably not done it this way, but thought you might have some ideas about it.
I want to tell you that your lovely photo of the sandwiches (along with Val’s 1-2 Tbsp method) have really nudged me towards trying this! The bread looks wonderful!! :-)
Meghan, thank you so much for your reply. :-) I didn’t know if there was a reason apart from flavour/health benefits that you chose avocado oil. I’m not sure when I will “get around to” trying it, but it seems like a very easy recipe and the end product looks GREAT!
Hi Meghan,
I just baked my bread but it didn’t rise a lot . Do you think my starter wasn’t ready? Also, it was kind of hard. I think maybe I should make it bake less next time? I’m such a newbie at this so I’m clueless lol
I dove in and have made 2 excellent loaves so far. This has become an addictive endeavor!
All of my taste testers have given 2 thumbs up. I’ve named my starter Jane Dough and she has become a bit of a celebrity as I’ve chronicled her development and baking accomplishments on Instagram.
This looks so amazing but what do you use if you can’t have tree nuts? Would you confidently substitute ground seeds instead? Sunflower, hemp or sesame?
I don’t know where it went wrong but it looks like pancake batter. I carefully, painfully measured everything, except I used almond flour because I’m out of almond meal. Sigh.
Thanks for this great recipe! I made a gf starter a few weeks ago and have been having fun trying out different recipes. There are so many variations on making gf sourdough bread! I was curious about why you add apple cider vinegar to your recipe, (its inclusion was one of the reasons I wanted to try your recipe) is it a chemistry thing or is it for flavour or something else? Thanks again!
Day one of the starter: I’m a little concerned. The starter seems *very* thick. It’s cake-y and certainly not at all like batter or gooey. Is this usual? Thank you.
Hi! I measured everything well and im thinking my dough feels a little wet- it holds together nice and clean but i’m debating on adding a little more sorghum flour?? Help!
Meghan ~
Thank you for this recipe….3 loaves in and all of them are like bricks. I am not getting any rising to the dough. What could I be doing wrong?
I would love to give this a try.We love sorghum because when I bake with it,it looks like whole wheat (I was also told by my friends who ate my baked goods made out of sorghum that they taste close to whole wheat ).
Btw,the dry ingredients in the bread that I have been making for years is very similar to yours,with the exception of brown rice flour which I don’t use ,but just 1 cup extra sorghum flour.
Now,I only use sprouted sorghum flour which I make myself. Will it be ok using it in this recipe?I am thinking it might interfere with the starter making.
is it possible to omit the psyllium husk powder in the recipe? Or can I substitute it with something else? I have been googling psyllium husk and google suggested to substitute it with either chia seed powder, flax seed powder or xanthum gum. Many thanks! looking forward to trying your recipe. Grace
I made the sourdough loaf, followed the recipe and used a GF brown rice flour starter and the loaf turned out dense, very heavy, texture was all wrong. I’ve looked up other recipes and none of them have the starter being mixed separate to the flours. Was really hoping to like this but unfortunately not a fan at all, sorry.
My starter is at day 6 and looking good, so I’m almost ready to go.
I have a steam oven and usually do two or three bursts of steam early in the baking process for my regular GF bread. Is the steam advisable/needed for GF sourdough?
Can’t wait to try this. It’s a challenge finding any flour at all in our current circumstances, but I’m excited to get going on it! Thanks for your easy to follow recipe, Meghan! And love seeing pics of Finn being your sous chef!
I want to start a starter, but I don’t have any Sorghum, does the flour matter for the starter? Can I use oat flour instead of sorghum as a substitute?
With all the time in our hands I’m ready to try the sourdough starter. Just one question, fresh is real uses brown rice flour your recipe use sorghum, is this right. I can make the starter with either?
I made your bread…”loosely” following the recipe. I had to make substitutions based on what I had available. My starter was based on Bob’s Red Mill All Purpose GF flour (garbanzo bean flour, potato starch, whole grain white sorghum flour, tapioca flour and fava bean flour). These were my substitutions: for the Sorghum flour I substituted Bob’s Red Mill All Purpose GF flour; for the brown rice flour I substituted Namaste Perfect Flour Blend (Sweet brown rice flour, tapioca starch, brown rice flour, arrowroot starch, sorghum flour and xanthan gum). For the arrowroot starch, I substituted tapioca. For the coconut sugar, I used regular table sugar. For the psyllium husk I substituted ground flax seed. I added 2 tsp xanthum gum.
I followed the the steps through Step 5. I didn’t let the dough rest for 1-2 hours, because I was doing this late at night. I went directly to step 6, and stirred in the starter and cider vinegar. I had a very sticky dough.
I let the dough rest for about 10 hours, and then baked it according to the directions, except added about 4 minutes to the first part of the bake where the lid is on. I didn’t have a stone, so put the load on the rack. Let it sit for 3 hours before slicing. THIS WAS THE BEST BREAD I’VE EVER MADE. And eliminating the step of waiting between making the dough and adding the starter made the whole process super easy. I’m so impressed with this, I’m going to make it again, and substitute a bit of one of the flours with 1/4 cup buckwheat, and add caraway seed and roasted onion to get a very savory “mock” rye loaf. THANK YOU for this recipe!
On another site, the baker said “phyllum husk (not the powder)”. Did you use powder for baking or whole or what variation…just wondering what to buy. Thanks!
This looks like a good recipe to try when I’m just venturing into Gluten Free Sourdough. However, I’m allergic to almonds! Is there a substitute I can use for the almond meal?
I made my first loaf today. It didn’t rise much, but I think that it is because I didn’t have the recommended flour (I used Robin Hood GF flour) and I had to add about 3/4 cup more flour because the dough was to sticky. However, it tastes great! I have a question. I activated the starter and when using 1 cup for the dough I had another cup left over. I put it in the fridge. I still have some starter on the counter as well that I am still feeding. Should I just now keep the one I activated? I was pleased when I activated it in a mason jar, it bubbled up almost to the top of the jar before I added 1 cup of it to my dry mixture.
Thank you so much for this recipe! I have been struggling for quite some time to find a simple gluten free recipe that didn’t turn into a baked brick. This is crunchy on the outside and moist on the inside. So much appreciated!
Hi, I made the starter and it was awesome – really active. I got a good rise on the dough, with your recipe, although I think there was a bit more water (accident), but when I turned it out of the banneton it was looking good. when I baked the bread it came out flat and heavy. What could have happened?
I have made my first gluten free dough dough loaf yesterday. I’m really pleased the best bread I’ve had since going gluten free. I don’t eat a huge amount of bread, so is it possible to keep my starter for a couple of weeks, until I need it again, with out feeding and dumping. What is the best way to do this? Thank you for your fabulous recipe. Liz
I am on day 4 seems to be a flop I did the same as you split it in half feed the 1/2 on the counter put the other half in the fridge what did you do with the half you put in the fridge? Half on the counter I feed again and should I feed again this evening? I have feed it twice today already
Hi! I’m really looking forward to making this bread, but I can’t seem to find the actual recipe. I’ve scrolled through several times, but can’t seem to find it. Is it still available? Thank you!
Hi! I made a loaf using the recipe with oat flour on the printable guide. It turned out really well. I am wondering, is it possible to bake this in a loaf pan? I was hoping for a taller bread to use for sandwiches
So I’m on day 3 of my starter (3 hours after morning feeding) and it looks like NOTHING is happening. I make regular sourdough often so I’m familiar with what to look for. Pretty sure I followed your directions carefully – any suggestions? Should I chuck it if nothing is happening by now? Also, it’s 3 quarters full in the mason jar so if anything DOES happen it’s going to overflow I would think – did you break yours up in 2 because of this? Thank YOU!
Hi Meghan, excited to try your GF bread, can you use whole grain sorghum and put it through the food processor? I can’t seem to find sorghum flower anywhere……sorry new to this! Thanks.
Hei Meghan,
To me it looks like the preparation of the starter is equivalent to a fermenting process. Is it safe if I am on a histamine intolerance diet? I would also avoid the apple cider vinegar. What do you think?
I am thinking about mixing the ingredients and adding them all in the bread machine. Could this work?
All the best to you Meghan
My dough is very sticky. There is no way I can knead it so I just used the spatula And mixed it very well. The bread itself is very dense and wet in the middle. Suggestions?
Hi Meghan. I love everything you do and just wish I could get your products in london U.K. I have just gone gluten free and already in a week my stomach aches seem to have gone. I am missing bread the most, but I really don’t have the kind of time or patience to make my own bread unless I can just dump all the ingredients into my bread maker. I’ll have to buy the gluten free sliced bread from the supermarkets for now until I can source something healthier. I think they have got a little better with their ingredients.
Hi Meghan
I love your sourdough recipes and I cycle through them every week. My family loves them and we don’t eat store bought bread at all anymore.
For the Low(er) Carb Sourdough recipe, I have tried to find Baru nut flour with no luck. Do you have a source you could share?
Thanks!
I ended up finding the nuts online. They are a bit tricky to grind but I managed. Thanks for the tip about green banana flour! I bought that too and will try it.
Hi, I would like to thank you for this recipe, after approximately 25 tries at gluten free sourdough bread this is the one that worked. Even my husband who isn’t gluten free loves it. Well done
I’ve been curious about trying sourdough for some time now. For someone who is sensitive to baker’s yeast, do you think this might be a good alternative, or is it possible that the natural yeast would have the same effect? Thanks :)
Hi Meghan, thank you for fabulous recipe. I’m wondering why you let the mix set before adding the starter and ACV? I’ve made other gf sourdoughs and I usually just mix it all together and then add to a bowl and let rise. Might that work too? Oh, and have you had experience weaning a starter off one flour and moving it to another? I have a brown rice flour starter and want to move it to the sorghum – just going to do it slowly in a seperate jar and see how i go. Any suggestions if you’ve done it yourself? Cheers and thanks.
Thankyou so much for these easy to follow and encouraging instructions! I made an attempt to make sorghum starter last year (not your recipe) and it was a sad fail! I have been given a nice active br. rice flour starter and am wondering if this would work in your recipe?
Meghan, I will be trying this recipe starting tomorrow for Easter. I was confused though about the sorghum flour part. Do I put the sorghum flour in the starter as stated plus 1 cup in the dry mix
Is there a video for this recipe? I have made it a few times, mindfully measuring all of my ingredients, and 1 1/2 cups of water is way too much. I have produced a very nice sourdough using your recipe but reduced water to 1 cup (and even then I needed to add a bit more flour to get a nice “somewhat firm dough with a bit of bounce”). I would be interested to watch a video to see what your dough looks like after adding the water and oil to the flour. Mine could not be kneaded, only stirred, until I added more flour. Just wanted to let others know that they may have the same problem. With adjustments, it makes a fantastic GF sourdough!
I have made this so many times and continue to make it weekly these days. It’s SOOO GOOD, one of the best GF sourdough recipes I’ve found. i do find that the crust gets super hard after a day or two- any suggestions on how to keep it softer? Store in fridge or no? Etc..?
Thank you!!


")


")


")


I cannot wait to start this(as soon as I have 8 days in a row when I’m home lol). I love the pic of your utterly adorable son. He is soooo cute!
I’m so glad to see you writing about gluten free sourdough. I went gluten free in 1991 and I too ate a lot of rice cakes and bricks. Those memories stick. I learned how to make my own gluten free sourdough starter 3 years ago and, as you said, I can’t ever go back. I love it. I think everyone who is gluten free deserves to know about gluten free sourdough. I make everything with mine now – bread, pancakes and waffles, crackers, muffins, pizza crusts and more. Such a game changer. Heather’s course is a great place to start (I took that too)!
Hello Meghan, I am also an alumni of the GFBA & haven’t tried the sourdough as yet. That is my goal for this year. I am just wondering how big is your actual loaf. They always seem to be fairly large when you look at the picture but I figure they can’t be very big as they are proofed in an 8 inch bowl. I guess it spreads a bit when you put it on the parchment. I would think the loaf would look like an extra large roll. Your loaf looks great!
Do I really need to use a dutch oven? Can I just put it in a pan to bake?
Hi! So excited to try this! Can you offer any recommendations on where you get your ingredients (like sorghum flour.. psyllium husk) do you order from somewhere or buy local?
I don’t seem to have maple syrup left at home lol can I use another sweetener for the starter? Is agave syrup ok?
Hi Meghan, i am making my bread today! I have a quick question… do you keep the parchment paper under the loaf in the dutch oven?
You can start the starter with a much smaller quantity of flour and water – like 1-2 Tbsp each. It reduces how much you need to throw out.
Hi Meghan
Should I follow your instructions on how much flour to discard or the fresh to real one? I’m just asking because both recipes have different amounts to discard. The fresh to real one says 1 or 2 spoonfuls.sorry I have so may questions. I’m just new to this. Thanks for your help!
Val, thanks for that! I would much prefer not to have to purchase that much sorghum flour, so I’m glad you shared your info. :-) I think that was the “game changer” that nudged me more towards trying this. That, and the photo of the sandwich!!!
Val – on the discarding-some days, how much did you discard?
Meghan – Thank you! What great photos. I have a couple of questions.
1. I’d prefer not to use avocado oil because I can’t eat avocados. Any suggestions on which oil to use? Maybe olive oil?
2. In order to keep the cost down, I’m interested in Val’s method of using 1-2 Tbsp each of flour and water. I realize that you have probably not done it this way, but thought you might have some ideas about it.
I want to tell you that your lovely photo of the sandwiches (along with Val’s 1-2 Tbsp method) have really nudged me towards trying this! The bread looks wonderful!! :-)
Meghan, thank you so much for your reply. :-) I didn’t know if there was a reason apart from flavour/health benefits that you chose avocado oil. I’m not sure when I will “get around to” trying it, but it seems like a very easy recipe and the end product looks GREAT!
Hi Meghan,
I just baked my bread but it didn’t rise a lot . Do you think my starter wasn’t ready? Also, it was kind of hard. I think maybe I should make it bake less next time? I’m such a newbie at this so I’m clueless lol
I save the discarded starter and make pancakes :) I found a recipe on the Cultures for Health site. Sourdough pancakes are yummy and no waste!
I dove in and have made 2 excellent loaves so far. This has become an addictive endeavor!
All of my taste testers have given 2 thumbs up. I’ve named my starter Jane Dough and she has become a bit of a celebrity as I’ve chronicled her development and baking accomplishments on Instagram.
This looks so amazing but what do you use if you can’t have tree nuts? Would you confidently substitute ground seeds instead? Sunflower, hemp or sesame?
Can the bread be baked in a loaf baking pan? I would like to have sandwich size slices.
My dough comes out very wet, any ideas? I end up having to add more flour. I am measuring carefully.
I don’t know where it went wrong but it looks like pancake batter. I carefully, painfully measured everything, except I used almond flour because I’m out of almond meal. Sigh.
Meghan: How do you maintain the starter?
Thanks for this great recipe! I made a gf starter a few weeks ago and have been having fun trying out different recipes. There are so many variations on making gf sourdough bread! I was curious about why you add apple cider vinegar to your recipe, (its inclusion was one of the reasons I wanted to try your recipe) is it a chemistry thing or is it for flavour or something else? Thanks again!
I’m ready to bake tomorrow and so just to clarify, we will end up with two mason jars in the fridge, each with about 1+ cup of the starter?
Hello Meghan,
Can I still make this bread if I don’t have a ceramic dutch oven?
Would it be possible to substitute the brown rice flour with another one? Thanks!
Thank you for this! I’ve got my starter going and it’s only day 3 and the jar is almost full with super puffed up starter. What should I do??
Day one of the starter: I’m a little concerned. The starter seems *very* thick. It’s cake-y and certainly not at all like batter or gooey. Is this usual? Thank you.
Hi! I measured everything well and im thinking my dough feels a little wet- it holds together nice and clean but i’m debating on adding a little more sorghum flour?? Help!
Meghan ~
Thank you for this recipe….3 loaves in and all of them are like bricks. I am not getting any rising to the dough. What could I be doing wrong?
I would love to give this a try.We love sorghum because when I bake with it,it looks like whole wheat (I was also told by my friends who ate my baked goods made out of sorghum that they taste close to whole wheat ).
Btw,the dry ingredients in the bread that I have been making for years is very similar to yours,with the exception of brown rice flour which I don’t use ,but just 1 cup extra sorghum flour.
Now,I only use sprouted sorghum flour which I make myself. Will it be ok using it in this recipe?I am thinking it might interfere with the starter making.
Hi Meghan,
is it possible to omit the psyllium husk powder in the recipe? Or can I substitute it with something else? I have been googling psyllium husk and google suggested to substitute it with either chia seed powder, flax seed powder or xanthum gum. Many thanks! looking forward to trying your recipe. Grace
I made the sourdough loaf, followed the recipe and used a GF brown rice flour starter and the loaf turned out dense, very heavy, texture was all wrong. I’ve looked up other recipes and none of them have the starter being mixed separate to the flours. Was really hoping to like this but unfortunately not a fan at all, sorry.
My starter is at day 6 and looking good, so I’m almost ready to go.
I have a steam oven and usually do two or three bursts of steam early in the baking process for my regular GF bread. Is the steam advisable/needed for GF sourdough?
Thanks!
Can’t wait to try this. It’s a challenge finding any flour at all in our current circumstances, but I’m excited to get going on it! Thanks for your easy to follow recipe, Meghan! And love seeing pics of Finn being your sous chef!
I want to start a starter, but I don’t have any Sorghum, does the flour matter for the starter? Can I use oat flour instead of sorghum as a substitute?
Hi Meghan,
With all the time in our hands I’m ready to try the sourdough starter. Just one question, fresh is real uses brown rice flour your recipe use sorghum, is this right. I can make the starter with either?
I made your bread…”loosely” following the recipe. I had to make substitutions based on what I had available. My starter was based on Bob’s Red Mill All Purpose GF flour (garbanzo bean flour, potato starch, whole grain white sorghum flour, tapioca flour and fava bean flour). These were my substitutions: for the Sorghum flour I substituted Bob’s Red Mill All Purpose GF flour; for the brown rice flour I substituted Namaste Perfect Flour Blend (Sweet brown rice flour, tapioca starch, brown rice flour, arrowroot starch, sorghum flour and xanthan gum). For the arrowroot starch, I substituted tapioca. For the coconut sugar, I used regular table sugar. For the psyllium husk I substituted ground flax seed. I added 2 tsp xanthum gum.
I followed the the steps through Step 5. I didn’t let the dough rest for 1-2 hours, because I was doing this late at night. I went directly to step 6, and stirred in the starter and cider vinegar. I had a very sticky dough.
I let the dough rest for about 10 hours, and then baked it according to the directions, except added about 4 minutes to the first part of the bake where the lid is on. I didn’t have a stone, so put the load on the rack. Let it sit for 3 hours before slicing. THIS WAS THE BEST BREAD I’VE EVER MADE. And eliminating the step of waiting between making the dough and adding the starter made the whole process super easy. I’m so impressed with this, I’m going to make it again, and substitute a bit of one of the flours with 1/4 cup buckwheat, and add caraway seed and roasted onion to get a very savory “mock” rye loaf. THANK YOU for this recipe!
This sounds great. Can you give me the volume of your ‘cup’ (ml) please so I can make sure to use the correct size? Thanks
On another site, the baker said “phyllum husk (not the powder)”. Did you use powder for baking or whole or what variation…just wondering what to buy. Thanks!
This looks like a good recipe to try when I’m just venturing into Gluten Free Sourdough. However, I’m allergic to almonds! Is there a substitute I can use for the almond meal?
The recipe asks for psyllium husk or psyllium powder? Thank you
I made my first loaf today. It didn’t rise much, but I think that it is because I didn’t have the recommended flour (I used Robin Hood GF flour) and I had to add about 3/4 cup more flour because the dough was to sticky. However, it tastes great! I have a question. I activated the starter and when using 1 cup for the dough I had another cup left over. I put it in the fridge. I still have some starter on the counter as well that I am still feeding. Should I just now keep the one I activated? I was pleased when I activated it in a mason jar, it bubbled up almost to the top of the jar before I added 1 cup of it to my dry mixture.
Thank you so much for this recipe! I have been struggling for quite some time to find a simple gluten free recipe that didn’t turn into a baked brick. This is crunchy on the outside and moist on the inside. So much appreciated!
It Sounds good .
How do I get a printable copy of this recipe
Hi, I made the starter and it was awesome – really active. I got a good rise on the dough, with your recipe, although I think there was a bit more water (accident), but when I turned it out of the banneton it was looking good. when I baked the bread it came out flat and heavy. What could have happened?
I have made my first gluten free dough dough loaf yesterday. I’m really pleased the best bread I’ve had since going gluten free. I don’t eat a huge amount of bread, so is it possible to keep my starter for a couple of weeks, until I need it again, with out feeding and dumping. What is the best way to do this? Thank you for your fabulous recipe. Liz
Why do I need to line the bowl in which the bowl is rising with a towel? I have it wrapped in a towel but did not line it
I am on day 4 seems to be a flop I did the same as you split it in half feed the 1/2 on the counter put the other half in the fridge what did you do with the half you put in the fridge? Half on the counter I feed again and should I feed again this evening? I have feed it twice today already
Where is your ingredient list for the dough? Why is there no list under “Gather your Ingredients?”
Hi! I’m really looking forward to making this bread, but I can’t seem to find the actual recipe. I’ve scrolled through several times, but can’t seem to find it. Is it still available? Thank you!
Hi!
For the bread recipe, is it whole pysillium husk or husk powder? I never know the difference!
Thank you!
Hi! I made a loaf using the recipe with oat flour on the printable guide. It turned out really well. I am wondering, is it possible to bake this in a loaf pan? I was hoping for a taller bread to use for sandwiches
So I’m on day 3 of my starter (3 hours after morning feeding) and it looks like NOTHING is happening. I make regular sourdough often so I’m familiar with what to look for. Pretty sure I followed your directions carefully – any suggestions? Should I chuck it if nothing is happening by now? Also, it’s 3 quarters full in the mason jar so if anything DOES happen it’s going to overflow I would think – did you break yours up in 2 because of this? Thank YOU!
Hi Meghan, excited to try your GF bread, can you use whole grain sorghum and put it through the food processor? I can’t seem to find sorghum flower anywhere……sorry new to this! Thanks.
What do I do with my starter after my first batch of bread? How do I keep it going? I hope I don’t just throw it out.
Hi, could I use a bean/pea.flour instead of brown rice flour as rice is not so good for me? Ty!
Hei Meghan,
To me it looks like the preparation of the starter is equivalent to a fermenting process. Is it safe if I am on a histamine intolerance diet? I would also avoid the apple cider vinegar. What do you think?
I am thinking about mixing the ingredients and adding them all in the bread machine. Could this work?
All the best to you Meghan
My dough is very sticky. There is no way I can knead it so I just used the spatula And mixed it very well. The bread itself is very dense and wet in the middle. Suggestions?
Hi Meghan. I love everything you do and just wish I could get your products in london U.K. I have just gone gluten free and already in a week my stomach aches seem to have gone. I am missing bread the most, but I really don’t have the kind of time or patience to make my own bread unless I can just dump all the ingredients into my bread maker. I’ll have to buy the gluten free sliced bread from the supermarkets for now until I can source something healthier. I think they have got a little better with their ingredients.
Hi Meghan
I love your sourdough recipes and I cycle through them every week. My family loves them and we don’t eat store bought bread at all anymore.
For the Low(er) Carb Sourdough recipe, I have tried to find Baru nut flour with no luck. Do you have a source you could share?
Thanks!
I ended up finding the nuts online. They are a bit tricky to grind but I managed. Thanks for the tip about green banana flour! I bought that too and will try it.
Hi, I would like to thank you for this recipe, after approximately 25 tries at gluten free sourdough bread this is the one that worked. Even my husband who isn’t gluten free loves it. Well done
Hi Megan,
I’ve been curious about trying sourdough for some time now. For someone who is sensitive to baker’s yeast, do you think this might be a good alternative, or is it possible that the natural yeast would have the same effect? Thanks :)
Hi Meghan, thank you for fabulous recipe. I’m wondering why you let the mix set before adding the starter and ACV? I’ve made other gf sourdoughs and I usually just mix it all together and then add to a bowl and let rise. Might that work too? Oh, and have you had experience weaning a starter off one flour and moving it to another? I have a brown rice flour starter and want to move it to the sorghum – just going to do it slowly in a seperate jar and see how i go. Any suggestions if you’ve done it yourself? Cheers and thanks.
Thankyou so much for these easy to follow and encouraging instructions! I made an attempt to make sorghum starter last year (not your recipe) and it was a sad fail! I have been given a nice active br. rice flour starter and am wondering if this would work in your recipe?
I’m allergic to coconut and vinegar. Are there any replacements for those?
Meghan, I will be trying this recipe starting tomorrow for Easter. I was confused though about the sorghum flour part. Do I put the sorghum flour in the starter as stated plus 1 cup in the dry mix
Can I use honey in place
Of maple syrup when I make starter?
I’m looking for a sourdough recipe that uses only sorghum flour … no seeds or nuts or rice flour etc. Do you have one? Thank you!
Is there a video for this recipe? I have made it a few times, mindfully measuring all of my ingredients, and 1 1/2 cups of water is way too much. I have produced a very nice sourdough using your recipe but reduced water to 1 cup (and even then I needed to add a bit more flour to get a nice “somewhat firm dough with a bit of bounce”). I would be interested to watch a video to see what your dough looks like after adding the water and oil to the flour. Mine could not be kneaded, only stirred, until I added more flour. Just wanted to let others know that they may have the same problem. With adjustments, it makes a fantastic GF sourdough!
I have made this so many times and continue to make it weekly these days. It’s SOOO GOOD, one of the best GF sourdough recipes I’ve found. i do find that the crust gets super hard after a day or two- any suggestions on how to keep it softer? Store in fridge or no? Etc..?
Thank you!!